
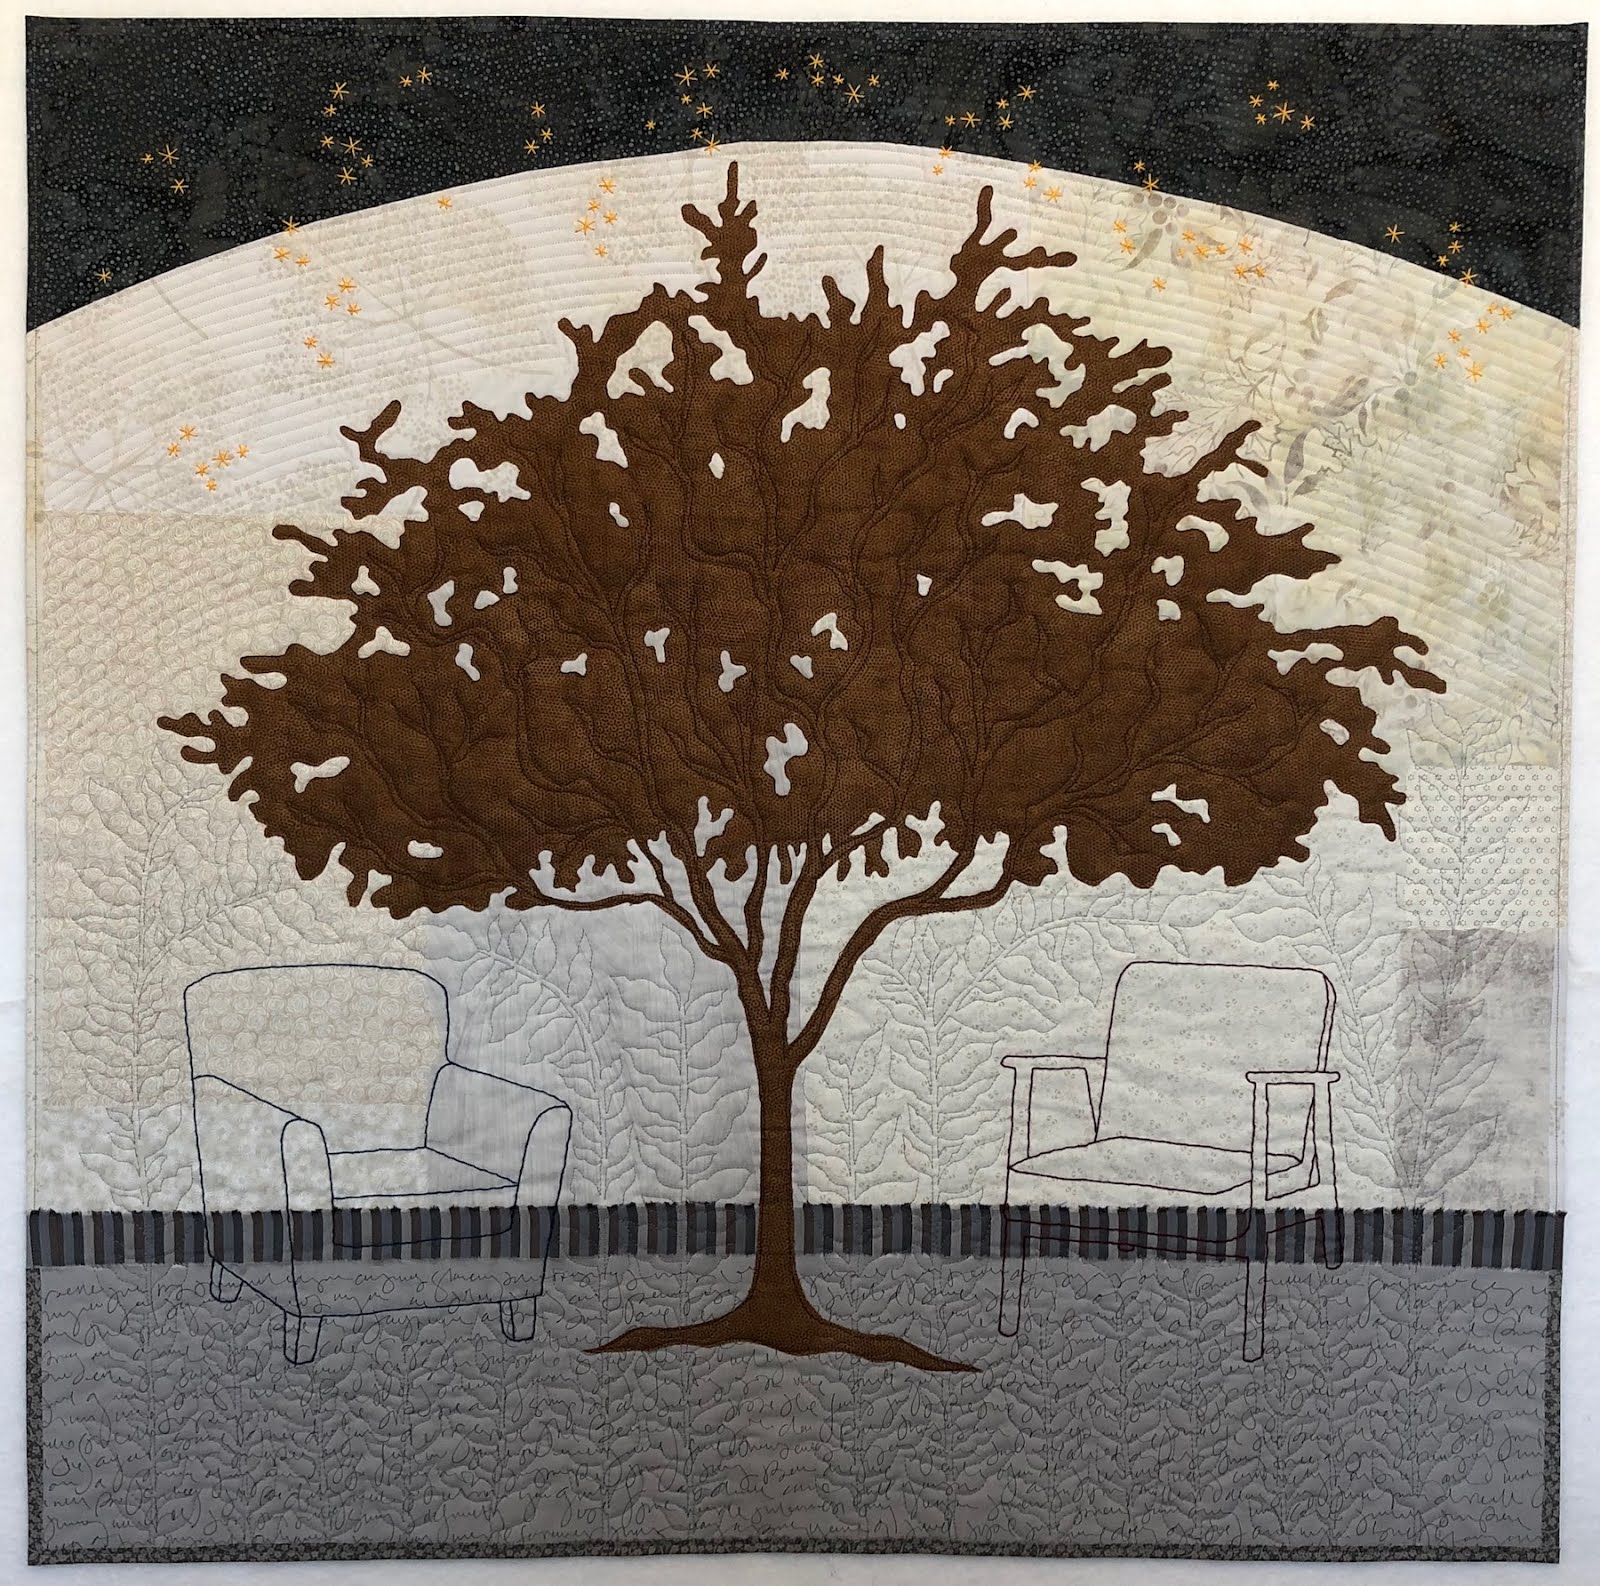
Conversations, 40x40"
Would you like to see some photos of my process?
I started when I got a wild idea to make something new to enter in Quilt Con. I am a member of the Dallas Modern Quilt Guild and I think the MQG is doing lots of interesting and exciting things. I really love being a member even though I'm not sure what I create is *modern* I think there is some cross-over in what I do and what is typically thought of as the *modern* aesthetic.
I started by choosing these three fabrics as inspiration. (I didn't end up using the leaf print.)

Plus, this photo of the tree at the end of my alley. I see it every day but have only begun to appreciate its beauty. This image is cropped and edited to highlight that wonderful silhouette.

At QuiltCon, all quilts less than 36" on any side go in one big "small quilts" category. I didn't want to be lumped into a category that could have tons of variety. I wanted to enter the applique category, so that meant the quilt had to be bigger than 36 inches. I opted to make a 40x40 inch square.
That helped me plan the size of the tree which I blew up using the excellent online application Rasterbator.

I printed out the pages and taped them together.

Then traced the tree onto parchment paper with a pencil.

Then transferred the drawing to pre-fused brown fabric.


Then I cut it out with tiny scissors. Tedious. Someone on Instagram asked if I used a digital cutter. Nope -- just good old scissors. I don't think a digital cutter could cut a tree this big anyway. Actually, I made it even more tedious by preserving the negative cut-out which I could use in another quilt.

Then I spent a few days at the design wall trying different compositions and fabrics. That low volume background is a nod to the modern aesthetic, but it's still me.

I settled on the blackish batik for the top arch, but that meant the bottom gray panel would need to be much lighter. I didn't have any light gray, so I had to make a trip to the fabric store. You can see I had a slightly lighter gray as pictured here, but not light enough.

Aha. Better. I filled that light gray panel with handwriting. (Actually, I'd already filled the darker gray panel with handwriting, so that's now in my stash for another project.)

Here's everything all flat and fused the batting. You probably wouldn't even notice, but I felt like the tree was a tiny bit unbalanced on the left, so I added one extra sprig. You may be able to see the difference if you scroll up to the earlier versions.

I knew I wanted to add a hand embroidered outline of a chair. I was originally planning just one chair. All my chair quilts are just single chairs. But obviously, this strongly symmetrical composition could accommodate two chairs.
I chose two Ikea chairs and fiddled with the size to make them fit under the tree. It was important to choose different -- and yet similar -- chairs.

Those chairs got traced onto freezer paper and ironed onto the quilt to act as a pattern to stitch around. This method is safer than using some kind of transfer pen.

I also added some scattered embroidered stars at the top.

Then I thought about adding more embroidery. My beloved Y stitches? Ultimately, I decided it didn't need anything else. Modern quilts are often minimalist. But then I needed to decide how to quilt it. That was really hard. I sketched some ideas. I rejected all of them.

Eventually, I decided I should start by quilting the branches of the tree. That meant I had to sketch them. Not my favorite task or a skill I feel particularly good about. I worked and re-worked the sketch using parchment paper so I could see all the little spaces I'd want the branches to fill.

Then I pinned the parchment paper to the quilt and free motion quilted following the lines. Then peeled off the parchment paper. (Another tedious task.)

Then I struggled with how to quilt the rest of the quilt. I decided on parallel lines following the arch. This kind of linear quilting is often seen in modern quilts. It was also tedious because I chose to start and stop at each little cluster of stars. Generally, I don't like machine quilting to cross over hand embroidery.

I considered more linear quilting for the bottom half of the quilt but decided on my favorite leafy motif instead. I especially like how these leafy vines nestle around the chairs.


Ta Da! Mostly done... but wait, still needs a binding. I did a fused binding, mostly matching the body of the quilt. Here's that overall shot again.

I sent off my entry today. From start to finish it took about 12 days. Not full-time days, but several hours. I really enjoyed the whole process and I'm delighted by the results. Here's the statement I included with my entry.
This silhouette is based on a tree at the end of my alley. I set it in a neutral composition and thought about conversations that might occur while sitting under it. The handwriting on the bottom panel represents all the stories and ideas we need to share with each other. It’s intended to be illegible so viewers can envision their own narratives. The combination of a variety of fabrics, frayed edges, irregular shapes, and scattered stitches reminds me of the complicated conversations that may happen between night and day, dark and light, or beginnings and endings.
*****
Read more about the process of developing your own creative voice and creating art that is distinctly *you* even while considering other aesthetic styles in my workbook Head, Heart and Hands: Developing Your Creative Voice.
*****
Read more about the process of developing your own creative voice and creating art that is distinctly *you* even while considering other aesthetic styles in my workbook Head, Heart and Hands: Developing Your Creative Voice.
12 comments:
I like all of your quilts but this is outstanding!
Thank you for sharing your process. I always love to see how artists create.
Really wonderful composition and thank you for all the little hints and tips. I've been thinking about a piece that has embroidery around shapes and this will really help Happy Holidays. Candy
Thanks for sharing the process. I really enjoyed seeing how this came together. I would have never thought about using the parchment paper for that large tree. Also using the templates for embroidering the chairs is a good tool for my quilting toolbelt.
Fabulous! I love the ethereal look of the chais....giving an overall dreamlike quality of past and future at the same time. And thanks for sharing the process.
Really enjoyed reading about your process - thank you so much for sharing all the layers in this work! :-)
I love it .Thank you for sharing the process you used. I'm going to check out the app you used to enlarge the photo.
Thanks for showing your process. I love your combination of using your photo, combining fabrics and use a couple of IKEA chairs. I am just not sure how you transferred the tree to the fabric. Lovely piece.
Thank you Deborah for sharing your process. It is a lovely piece and I look forward to seeing it in person at QuiltCon!
Great work and loved reading the comments here. We all learned something.
Of course I liked the chair idea and will be trying that immediately on my tea bag surface.
This is very beautiful! Thanks for sharing your procedure. How do you put the handwriting on the fabric? Do you actually write on it?
Very interesting. I had the same question as another reader. Once you traced the tree onto parchment paper, how did you transfer that drawing to the fabric?
I loved reading about your process Deborah! Thank you for including your thoughts,and the frustrations you felt making so many decisions. Such an eye-opening post.
Post a Comment