Showing posts with label stitching. Show all posts

Saturday, July 04, 2020

How to Make Greeting Cards from Artist Photos

Every year or so I stitch up a bunch of greeting cards that I use in all kinds of situations. I just finished a new set, so I thought I'd share the process and include all the materials I use.


I start by ordering blank cards and envelops. These are 5x7 and work great with a 4x6 image. Here's a link to the set of 50 I like. 


I also order 50 4x6" photos from Shutterfly. I just go through my recent work and crop them to a nice detail. I think I chose about ten different images and ordered five of each. I ordered glossy prints this time, but I think I prefer matte.


Then I stitch the photo to the card using a coordinating thread color and a wide stitch. I start in the middle of the bottom of the image and stitch about 1/8 inch from the edge.


I leave the threads long...


Then trim them a little.


Here's what they look like from the inside.


Several years ago I ordered a self-inking personalized stamp from Etsy. It took several weeks to arrive, so I'm not sure I'd recommend that particular shop, but you can easily find lots of options and decide what info you want to include.


I use this same stamp for the back of my small art quilt collages that are mounted on mat board.

Ta Da! I'm not sure it's "easier" than ordering professionally printed cards. It's probably cheaper. It's also easier to get multiple images, usually when you order printed cards, you order just one design. Plus, I like that they feel a little hand-made and it's certainly not a difficult project.


Let me know if you make some!

Wednesday, January 29, 2020

How Long Did It Take You To Make That?

People often ask how long it takes me to create a piece of work. In this case I have a pretty good idea -- about 10 to 12 hours. I know because I made it in about a day and a half.

Planted Perception, 20x20 inches

It was a learning experience. A few thoughts about how it came together.

My friend Brenda Gael Smith is an amazing artist and excellent curator. I was honored to be included in two of her previous traveling exhibitions. The organization, marketing, professionalism, exposure and good spirit in her exhibitions is unmatched. 

This piece, Rising Resting, was a part of Brenda's Matter of Time Textile Exhibition.

When she announced her Vision 2020 Textile Exhibition, I considered entering, but I wasn't excited by the theme and wasn't motivated to set aside time to make something to enter.

As the deadline neared,  I began to wish I had made something to enter. The feeling kept nagging. But I was busy with lots of other things -- some important things, some things probably less important than the attention I'd given them.

Coincidentally, a friend was visiting while she went through coaching training. I told her about my nagging feelings and she practiced her new coaching skills by asking just a few very specific questions that helped clarify what I should do. I should make a quilt to enter.

After a discussion with her on Tuesday night, I decided I'd give it a go. Wednesday was entirely free. I was busy from from 9 to 4 on Thursday. The deadline was Friday morning at 7 am. Very tight to create a 20x20 inch quilt from scratch.

I made some notes about the theme and the potential design. Leaning into a composition that I've explored regularly would give me a jump in the creative process. I decided to continue with my constructed cruciform series. It's a collection of fabrics in mostly rectangular shapes in a loose cruciform composition.


This piece, Shifting Shelter, uses this "constructed cruciform" composition.

This one too. It's Green Bowl (and features the same red stripe that shows up in this new quilt).

I planned to include an embroidered outline of a set of eye glasses. Part of me felt that was too easy and obvious, but another part of me thought it was an interesting shape and would lend itself to a variety of symbolic interpretations. 

I spent an hour or so on Wednesday morning painting a piece of cloth that would (maybe) become an interesting focus. I thought I had a plan. Then I began to pull together additional fabrics palette to go with the painted piece. 

Then this old fabric with vegetables jumped out at me. But but but... what doesn't it have to do with Vision? I kept trying to set it aside and it kept returning.


The majority of the day on Wednesday was spent fussing with the composition. The painted fabric was entirely rejected. I swapped out various fabrics. I kept slashing, slicing and cutting shapes that felt unique and said interesting things to each other. Eventually, I had to settle on a design and fuse. 

I felt rushed, but also satisfied that it was coming together. I didn't feel the design was fully refined, but I liked it. 

Then I added hand embroidery. Again -- leaning into my favorite stitches and not exploring anything new. Just the outlined eyeglasses, a few lines of Ys and a scattering of stars. 

Before the end of the day on Wednesday the design was fused and the embroidery was finished. I fused on a backing and would leave Thursday evening for all the quilting, photography and entry. Still tight, but I was too far along not to finish.

Quilting came together quickly. Thankfully, it's a small piece so I didn't even have to move my machine out into the dining room which I have to do with larger pieces. I outlined the vegetables and did simple stacked lines in most of the other areas. Not exciting at all -- it hardly adds any interest to the quilt. Some interesting motifs in a contrasting color in the background might have been a better choice. 

Lastly, I squared it up and zigged the edges. (That's actually one of my favorite edge treatments -- especially for small pieces. So, I didn't have to compromise on time with that choice.) I used my iPhone to take a picture. Not ideal, but generally adequate for entries (though not for print publication).

I wanted to come up with a title that would point toward the idea of different kinds of vision. But I also wanted to try to connect those ridiculous vegetables in some way. 

Some ideas...

I settled on Planted Perception. Plant... you know, like vegetables are plants?! But also you might plant a seed of an idea? A perception? 

For the brief artist statement, I came up this: 
The things and ideas we see, notice and perceive help tell the story of how we relate to the world and to each other.

It's a little esoteric and may or may not give a viewer any insight into the quilt, but it does express a concept I really believe.


It was not accepted into the exhibition. Sigh. I was sort of disappointed, but not entirely surprised. This piece of work is fine. I think it's odd and interesting. It would have been better if I'd given myself more time. That doesn't mean it would have been selected. Brenda has written about the selection process. If you're interested in that kind of thing, it's very insightful.

I learned a lot through this specific creative process. 
  • It's ok to be obvious. (The glasses are fine.)
  • It's ok to return to proven designs, motifs, palettes and techniques.
  • Plain background is boring. (Using just the tan fabric for the background flattens everything.)
  • I must make time for making art. I'm an artist first -- teacher and businesswoman after that. The art drives everything else.
  • Figure out what questions I need to answer to move forward. Or hire a coach.
  • I get to decide what's important. Try not to let too many outside influences impact my own priorities.
  • Too many hours of just creating with no time for managing stuff around the house and taking time to relax makes me irritable.
  • Planning and executing the free motion quilting in a way that compliments the design and adds something to the overall visual impact is an area I need to work on.
  • Deadlines are excellent motivators.
  • I can squeeze out more productive time during the day than I usually do.
  • Radishes are cool looking.

Tuesday, December 03, 2019

Working in Three-Dimensions

I've been feeling a slight tug toward creating three dimensional work for years. In fact, a couple years ago, I experimented with small fabric bowls and especially like this structure.

So I finally came back to it with the challenge of using this format to create a wall-hung art quilt.

I planned to created a two-sided quilt, cut it up, sew it into small vessels then sew the vessels back together. I wan't sure how it would come together, but I knew the only way to find out was to work through the process. (As is true with most things.)

I shared most of this process on FB and IG, but now it's all in one place here in this blog post.

I decided to create a Kansas landscape and gave myself the parameter of working with only my stash of pre-fused fabrics.

I built the design of felt for batting thinking that would give the vessels more body and structure.


Lots of wrinkly bits!


Beginning to be tamed, fused, flattened.


Here are the front and the back side by side.


Next I needed to quilt the whole thing. I started with this "wheat" section leaving some long threads to add movement and texture. I had to stitch from both the front and the back to get the loose threads on both sides. Sort of tedious.


And then I cut it into 6 inch squares.


As I began to form the vessels, I marked the dimensions on the edges and hand stitched.


Here's the first one I formed. It's fine, but the center square is not an actual square. My angles were a little off which skews the shape a little. Maybe not a big deal, but I needed to find a way to get a better and more consistent result.


I wondered if just one stitch at the corners would work?

No. Still skewed and I didn't like the open edges.

Clips to the rescue. Plus measuring!


Then I just kept stitching One by one by one.


I was beginning to think about construction and pinning them to my design wall.

I was liking the way the design folded over the corners. I knew the horizontal lines of the original design would be angled because of the construction of the vessels -- but they still felt visually connected.

Then I considered angling the vessels to restore the horizontal lines.


Aha! I really liked this version and especially liked the possibility of the open squares between the vessels.

Eventually I finished stitching up all the vessels, then I stitched them together. In this time-lapse, you can see me measuring the positions for the joins and stitching them together.


Finishing this was so satisfying. It was a fun process. It's good to do something different. 

I titled it Vessels: Heartland. It's 26x16x2" here's the front.


And here's the back.

Some details.


I am delighted to say that it was juried into Art Quilt Elements which will open at the Wayne Arts Center in March.

I'm intrigued by this structure and have been thinking about what to do next. Actually, I even ordered some fabric with a new idea in mind. Then I got distracted by something else. So, stay tuned.

Saturday, June 01, 2019

Treelines Art Quilt -- The Whole Process

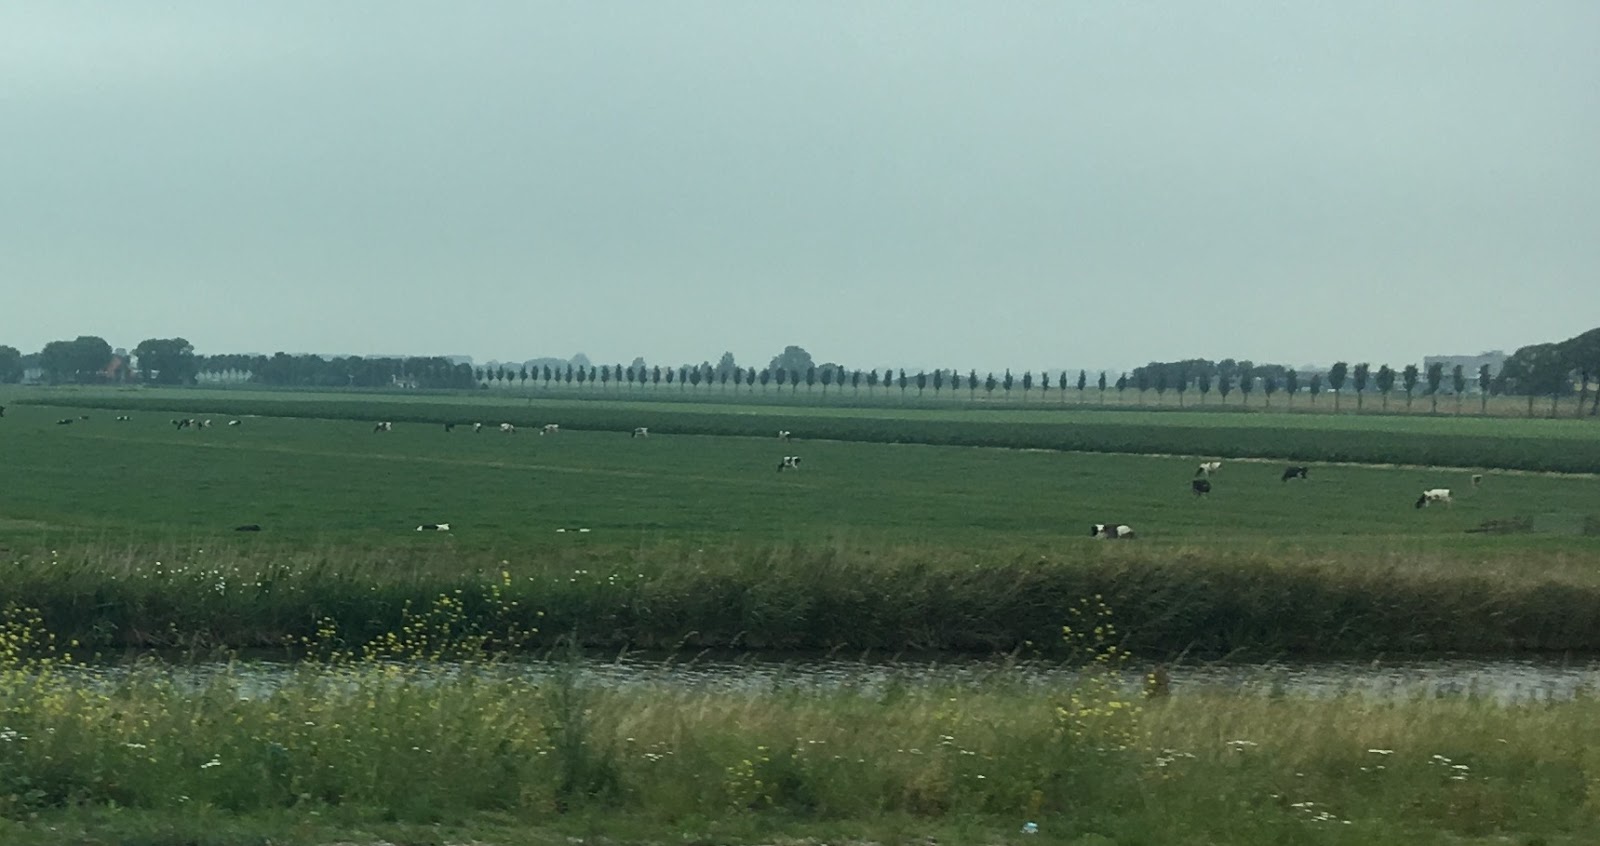
My family and I took a wonderful trip to the Netherlands last summer. One of my favorite things was the bus ride from Amsterdam out into the countryside. I was entranced by the lines of trees. 

I've zoomed in and cropped this picture so it's blurry, but you get the idea. 


Here's another. The cows too!

This was the beginning of my inspiration for a new art quilt collage. Another bit of inspiration was my desire to enter the "large appliqué" category at the Quilters Guild of Dallas annual show which requires quilts be at least 72 inches on one side, but not all sides. Aha. I could made a long narrow landscape design. I took those two parameters and got to work on some sketches.


I put some strips of fabric up on the design wall.

I tried some other fabrics and began cutting strips of trees including big round trees #1 in blue.

Then I tried some other fabrics and cut some more trees including big round trees #2 in aqua.

I knew I wanted to break up the trees with a wide house-like shape similar to the barn in the top photograph. This would be a great place to incorporate some handwriting as a surface design pattern. I tested some pens and colors.


 The writing is intentionally illegible, but I think it was mostly stream-of-thought about our time in the Netherlands.

With the addition of the green barn and big round trees #3 in red, I eventually arrived here.

There are lots of problems with contrast in this composition which meant I needed to shop for some alternatives. I brought swatches with me.

After lots of time at the design wall, the dining room table and the ironing board, I was able to move forward and began adding strips within each layer that were similar in color, but different fabrics and patterns.

One of the pieces I wanted to add was this lovely green pointy print.


But I only had a tiny bit. I sent a desperate text to Kristin LaFlamme and this yardage arrived a few days later. Yeah!


By this point, I was growing weary of working on something so wide. Because all those strips go all the way from left to right, it was tricky to move them around, get them fused together and keep everything aligned. That's part of the challenge of working with an improvisational collage technique. But I can't imagine doing it any other way.

I wanted to break up the wide strip of red on the bottom and remembered the grasses growing along the roadside in the Netherlands.

Ta Da... grasses. 

At this point, I decided it needed something else. My work is all about layering fabric, paint and stitching and this piece did not have as much paint as it could have. I mean, there's already a lot going on, but sometimes more is more.

I sketched some possible motifs to create a foam stamp.

It's a little scary to add stamped painted patterns on top of the finished fused top but I did it. I didn't take any pictures of the process though. You can see the green leafy shape in the foreground as I'm fusing the entire quilt to batting on the dining room table.

The finished fused top. Can you believe how many steps it takes to get here?! I'm glad I added the green stamped leafy motif. It visually ties the layers together.

The sun-like shape in the sky strip is a pattern I created using a hot-glue gun stencil. I wrote about this technique for Quilting Arts magazine.

I printed several copies of the quilt and began planing the stitching.

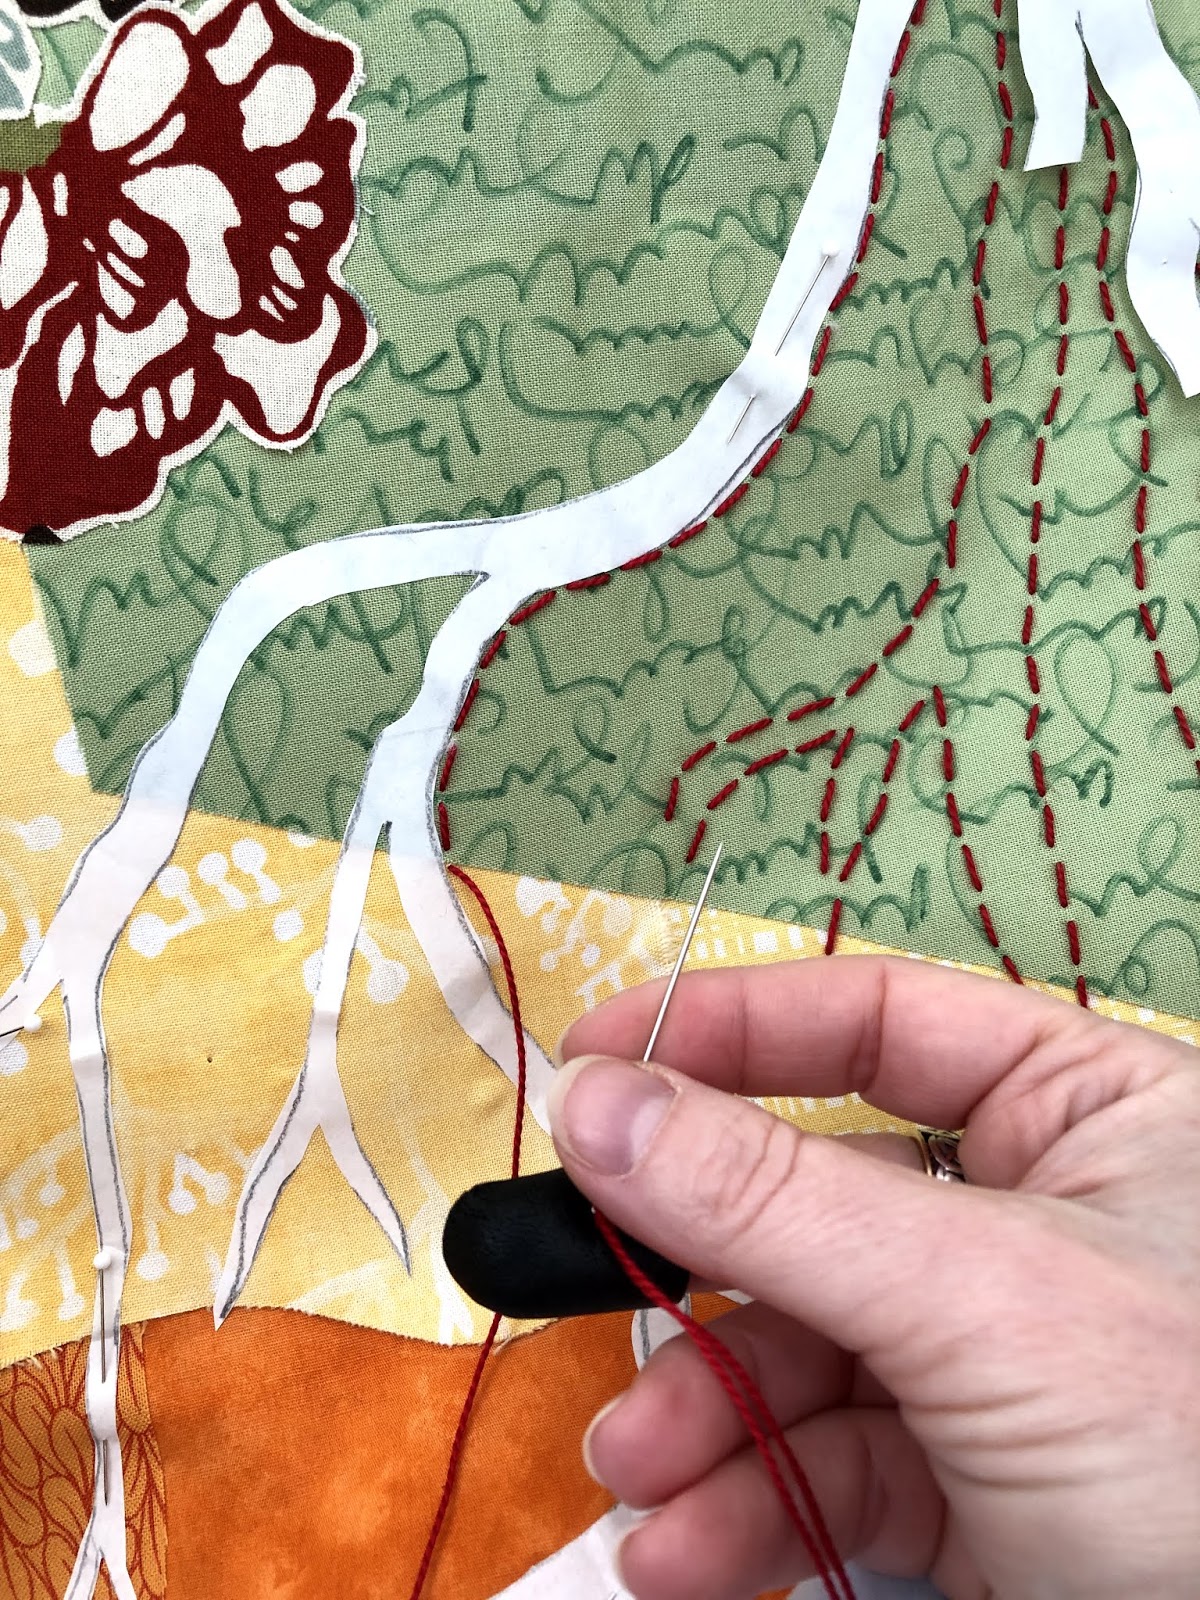
I knew the green house needed something. Eventually I decided on a ghost tree silhouette.


I created the tree pattern using freezer paper that I ironed to the top to stitch around. I sometimes like this method better than marking the design on the quilt top. Yes, the freezer paper peels off eventually, but it's easily reattached. Pins helped the process too.

After finishing the hand embroidery, I fused on a backing and added free motion machine quilting.

It did hang in the Dallas Quilt Show in the large appliqué category!

I am also delighted to say that it has been juried into an upcoming Studio Art Quilt Associates global exhibition called Connecting Our Natural Worlds which will premier at the Arizona-Sonoran Desert Museum in Tuscon, AZ in October.

I recently had Treelines and some of my other work professionally photographed.

Treelines, 30 x 80 inches


I love how the ghost tree silhouette turned out.

The yellow fabric with the blue raindrops was created using the rolling prints techniques I demo'ed in this video.

 See the tiny snippets of the black and white stripe? They are my suggestion of cows.

Thanks for scrolling through all those pictures! I hope you enjoyed a peek into my process.

Oh, by the way, the big round trees in blue and aqua and several of the other rejected trees from this project have already made their way into other quilts. Scroll through my Instagram and see if you can spot them. 

***
If you're intrigued by my process, you may enjoy my book Art Quilt Collage: A Creative Journey in Fabric, Paint and Stitch.

I've also created a workbook called Head, Heart and Hands: Developing Your Creative Voice which includes lots of ideas, inspiration and thoughts about how I arrived at my unique style and process.